Buying a Home With a Pool?
Use This 5-Point Pool Inspection Checklist Before You Make an Offer
- With deep dive and rough price breakdown
Buying a home is an exciting—but often stressful—process. That stress can increase when the property includes a swimming pool. Many buyers have never owned a pool before and don’t fully understand the potential issues, maintenance responsibilities, or costly repairs that can come with one.
In this article, I don’t cover every possible pool issue, but I do focus on the most important and expensive problems buyers should be aware of. These are the issues most likely to turn a dream purchase into a costly headache if they’re missed. Let’s take a closer look.
- Download & Save Your Printable Pool Pre-Purchase Checklist (PDF) -
Free buyer checklist: This professional guide helps home buyers identify hidden pool problems that can cost thousands after closing. Save this page and use it during your home showing.
How to Use This Checklist
- Walk through each checklist item during your showing
- Mentally note or photograph any red flags you see
- If you find any of these issues, a professional pool inspection is strongly recommended before removing contingencies
Important: Most standard home inspections do not pressure-test pool plumbing or locate underground leaks. The inspector may not even be aware of these top 5 red flags!
We will start with the checklist and then below we will take a deeper dive into each issue.
Pool Pre-Purchase Inspection Checklist
Use this guide at your next home showing to identify costly pool issues before you make an offer.
☑️ Checklist Item #1: Cantilever Decking
What to Look For:
- Deck slightly overhangs pool
- Separation between deck and coping
- Deck has no expansion joint
Why It Matters: Cantilever decks are structurally tied to the pool. Cracking often occurs in bond beam (tile line) of the pool. Repairing often involves redoing the entire deck
Risk Level: High
Recommended Action: Professional pool leak inspection before purchase
☑️ Checklist Item #2: Visible Structural Cracks
What to Look For:
- Cracks in deck that continue into the pool structure
- Cracks through plaster, tile, or gunite
- Cracks extending downward from the tile line
- Previously patched or sealed crack repairs
Why It Matters: Not all cracks leak, but structural cracks frequently do — and repairs can be costly and uncerten.
Risk Level: High
Recommended Action: Professional pool leak inspection before escrow removal
☑️ Checklist Item #3: Copper Pool Plumbing
What to Look For:
- Homes built prior to the 1980s
- Green or brown exposed copper piping
- Any plumbing that is not white or grey PVC
- Concrete skimmer
Why It Matters: Copper pool plumbing corrodes from the inside out and commonly fails underground without visible warning signs.
Risk Level: Medium - High
Recommended Action: Pressure testing strongly advised
☑️ Checklist Item #4: Natural Stones as structural component.
What to Look For:
- Natural stones that are built into the pool wall
- Natural stones that are partially submerged
Why It Matters: Natural stone oftin moves and should not be used as a structual part of the pool. Leaks under natural stones are a recurring issue.
Risk Level: Medium
Recommended Action: Inspection recommended before closing
☑️ Checklist Item #5: Auto-Fill Systems or Constant Water Use
What to Look For:
- Auto-fill actively running during showings
- Garden hose left on deck leading to the pool
Why It Matters: Auto-fills mask ongoing leaks. If the pool has a leak the autofill will run to make up for the loss. If a homeowner can't be bothered to put a hose away, they likely are filling the pool alot.
Risk Level: High
Recommended Action: Perform a bucket test and schedule inspection
Final Checklist Review
If any of these issues are present, I highly recommend a professional pool leak detection before moving forward with the purchase. This way you will fully understand what you are buying and if you can afford the repairs that will be coming in the near future.
Before You Close on the Home
Standard home inspections typically do not locate underground pool leaks or fully test pool plumbing.
If you are buying a home with a pool in San Diego, a professional non-invasive pool leak inspection can help:
- Identify hidden leaks before purchase
- Avoid costly post-closing repairs
- Strengthen buyer negotiations
- Schedule a Pool Leak Inspection -
Below is a deeper dive into each issue.
#1 - Cantilever deck - $20k - $80k
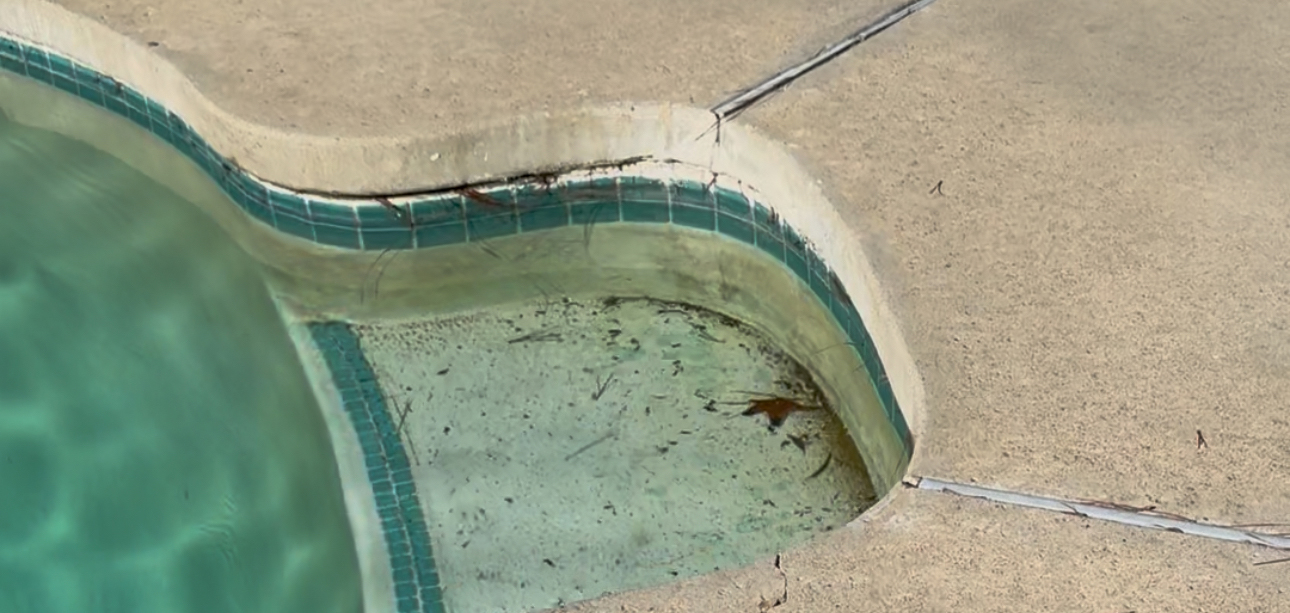
Cantilever Pool Deck Breakdown: When a cantilever pool deck starts to fail, it is often one of the most expensive problems a pool owner can face. That’s why it earns the number-one spot on this list.
Cantilever decks were especially popular in the 1970s and 1980s. Their clean, modern appearance and slight overhang created the illusion that the deck ended exactly where the pool began, without the visual barrier of traditional coping. While this design eventually fell out of favor, tens of thousands of these decks were installed, and many of them are now reaching the end of their service life.
Unlike traditional pool decks, cantilever decks do not have an expansion joint separating the deck from the pool. Instead, each slab of concrete is designed to move independently, sliding back and forth across the top of the pool’s bond beam and past the slabs on either side. In theory, this movement is supposed to accommodate soil and ground movement. In reality, that’s a lot to ask of a large slab of concrete.
What often happens is the deck moves—and takes part of the pool structure with it. This typically shows up as lateral cracking in the pool’s bond beam or along the tile line. The damage is often extensive and can span an entire side of the pool.
If the cracking occurs above the normal waterline, it may damage tile without immediately causing a leak. However, when cracking occurs below the waterline, the pool can begin leaking into the surrounding soil. As water saturates the soil, it expands or contracts, which causes additional movement and further worsens the problem.
In these situations, attempting to repair only the bond beam cracking without addressing the deck itself is a mistake. The deck is the root cause, and unless it is corrected, any cosmetic or structural repair to the pool is likely to fail.
Proper repairs typically require major renovation, including removal or modification of the deck and, at a minimum, replacement of the pool coping and tile line. In more severe cases, portions of the pool plaster may also need to be replaced.
Realistically, repair costs usually start around $20,000, and even that would be considered on the low end. For an average-size pool and deck, costs more commonly range from $30,000 to $80,000, depending on the extent of damage, deck size, and local labor costs.
What to look for: Cantilever decks are usually easy to identify. They lack visible coping or an expansion joint and slightly overhang the pool shell.
Bottom Line: Approach any home with a cantilever pool deck with extreme caution. Unless you have the budget for a major remodel in the $20,000–$80,000 range, this type of deck can quickly turn an exciting purchase into a very expensive surprise.
#2 - Cracks in the structure - $2k - $30k
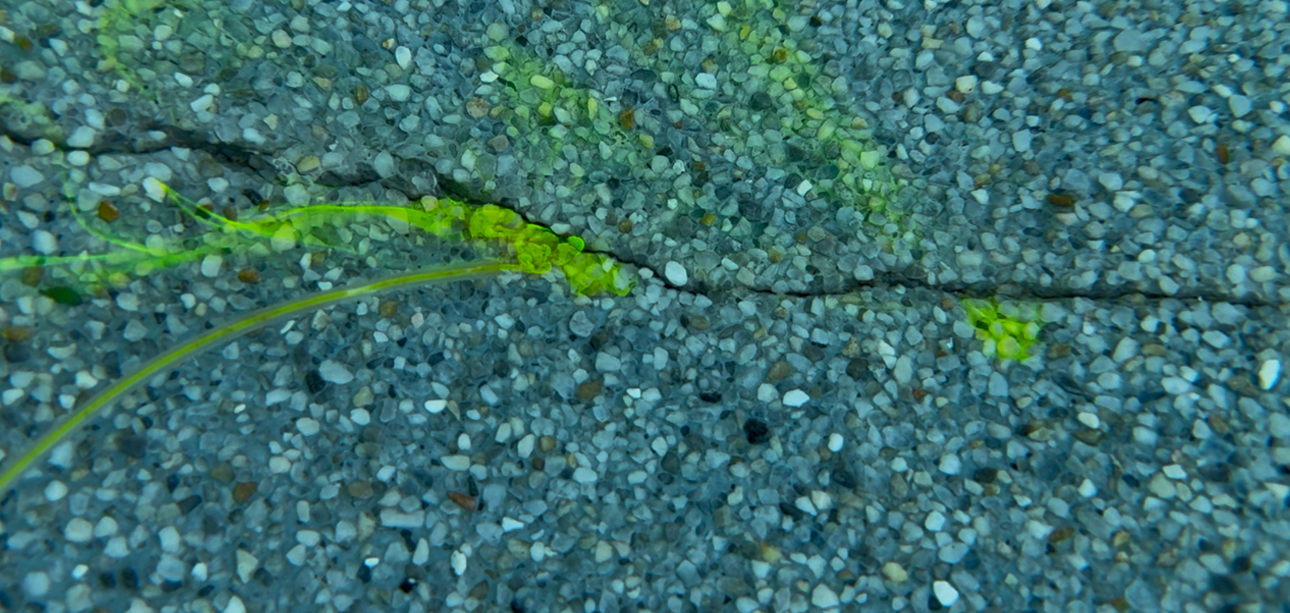
Structual Pool Crack Breakdown: Few pool problems are more unsettling than a structural crack. The uncertainty surrounding whether the problem can truly be resolved is exactly why structural cracks come in at number two on this list.
Structural cracks are caused by immense and often unpredictable forces. Even professionals who repair pool cracks for a living will tell you the same thing: if the ground wants to move, there is very little that can be done to stop it.
In some cases, a structural crack is the result of a one-time event, such as an earthquake or initial soil settlement shortly after construction. When this is the case, a properly performed professional repair can permanently resolve the issue, and the crack is unlikely to return.
More often, however, structural cracks are caused by ongoing or gradual ground movement. This commonly occurs when a pool is built on a hillside or on fill dirt that was not properly compacted. In these situations, there is no reliable way to guarantee that the movement—and the cracking—will not continue.
It is not uncommon for homeowners to repair the same crack multiple times, each time using a more advanced and more expensive method. While higher-end repairs often last longer, they frequently only delay the problem rather than eliminate it, and the crack eventually returns.
Repair costs typically range from $2,000 to $5,000 per crack, depending on location and severity. In cases involving multiple cracks or major structural reinforcement, total repair costs can climb to $30,000 or more.
What to look for: When inspecting a pool for potential structural cracking, start by walking the perimeter and checking the surrounding deck. Cracks in the deck will sometimes continue through the coping and into the pool wall. If you find deck cracking, follow it carefully to see if it leads into the pool structure.
If no deck cracks are visible, inspect the tile line around the entire perimeter of the pool. Look closely at each tile for vertical cracks. If one is found, follow it downward to see whether it continues into the pool wall.
Finally, look into the water and examine the walls and floor of the pool. Watch for lines, discoloration, or anything that looks inconsistent with the surrounding surface, as these can indicate underlying structural issues.
Bottom Line:
Structural cracks are caused by powerful forces that are difficult—if not impossible—to predict or control. If a pool has a structural crack, there is a strong possibility the issue will be expensive and recurring. Even after spending $5,000 to $30,000, there is no absolute guarantee the crack will not return.
#3 - Copper lines - $10k - $40k
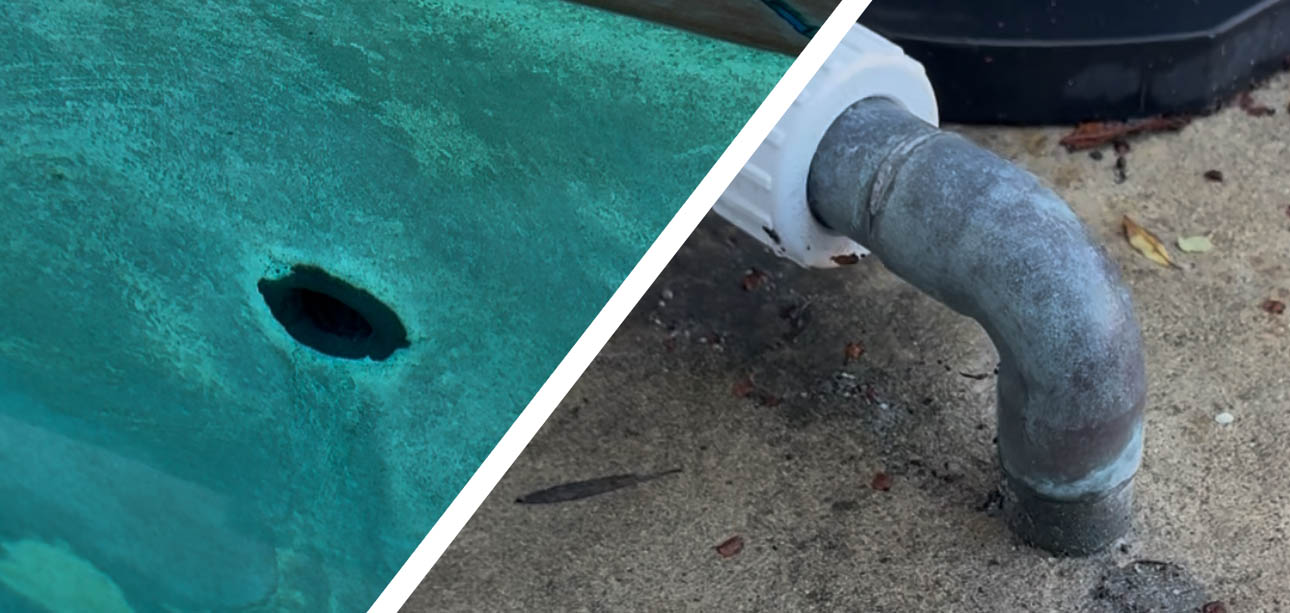
Copper Pool Plumbing Breakdown: Copper pool plumbing is another major hidden expense that can be devastating for new homeowners, which is why it comes in at number three on this list.
Decades ago, it was standard practice to plumb pools with copper pipe. That changed in the 1960s when contractors began switching to PVC due to its lower cost, flexibility, and ease of installation. By the early 1970s, copper had been almost completely phased out for pool plumbing.
This means that any copper plumbing still in service today is typically 50 years old or more. That is plenty of time for corrosion to take its toll—especially in an environment constantly exposed to pool chemicals.
When a copper pool line begins leaking, it is rarely just a single isolated failure. In most cases, corrosion has weakened the pipe in multiple locations, resulting in numerous small leaks rather than one obvious break. For this reason, it often does not make sense to spend time pinpointing and repairing a single leak when the same pipe is likely to fail again elsewhere.
As a result, the recommended solution in most cases is to replace the entire copper line with PVC. Unfortunately, if one line is copper, it usually means others are as well. This often includes the skimmer line and, in many older pools, a concrete skimmer and copper main drain.
While it is technically possible to replace components one at a time as they fail, doing so is usually more expensive in the long run than addressing everything at once.
A full copper plumbing replacement is a major project. The deck must be cut open to trench for new plumbing, and the pool is typically drained so new penetrations can be bored into the pool structure for the PVC lines. In most cases, the main drain is abandoned, and a new skimmer is installed and tied into the tile line. At that point, you are essentially replumbing the entire pool.
For an average-size pool with standard plumbing, costs generally fall in the $10,000 to $40,000 range, depending on factors such as pool size, deck material, distance to the equipment pad, and site access.
In some cases, a previous owner may have replaced part of the copper plumbing but left the skimmer and main drain untouched. This is actually the most common scenario. When this happens, the solution is usually to replace the skimmer with a modern PVC unit and abandon the main drain entirely. Depending on the surrounding deck and whether an equalizer line is added, this type of update typically costs $2,000 to $5,000.
The key takeaway is simple: any copper plumbing left in a pool will eventually need to be replaced.
What to look for: To identify copper pool plumbing, start by inspecting where the plumbing penetrates the pool wall. PVC pipes are typically white or light gray, while copper pipes are dark brown or blackish and often appear misshapen or irregular.
Next, check the skimmer. Modern skimmers are round and made of white plastic. If the skimmer is square, made of concrete, or constructed from metal, there is almost certainly copper plumbing below it that will need to be updated.
Finally, inspect the equipment pad. Look closely at the pipes where they enter the ground. Sometimes the above-ground plumbing has been updated to PVC, while the underground plumbing remains copper. In these cases, the pipe may transition to copper right before it disappears into the soil or deck—sometimes within the last half inch. Look carefully.
Bottom Line: Any copper plumbing still in a pool is 50+ years old and heavily corroded. In most cases, repairing a single leak does not make sense because additional failures are likely to follow. Ultimately, copper plumbing leads to a full replumb, typically costing $10,000 to $40,000.
#4 - Natural stones half in the pool - $5k - $10k
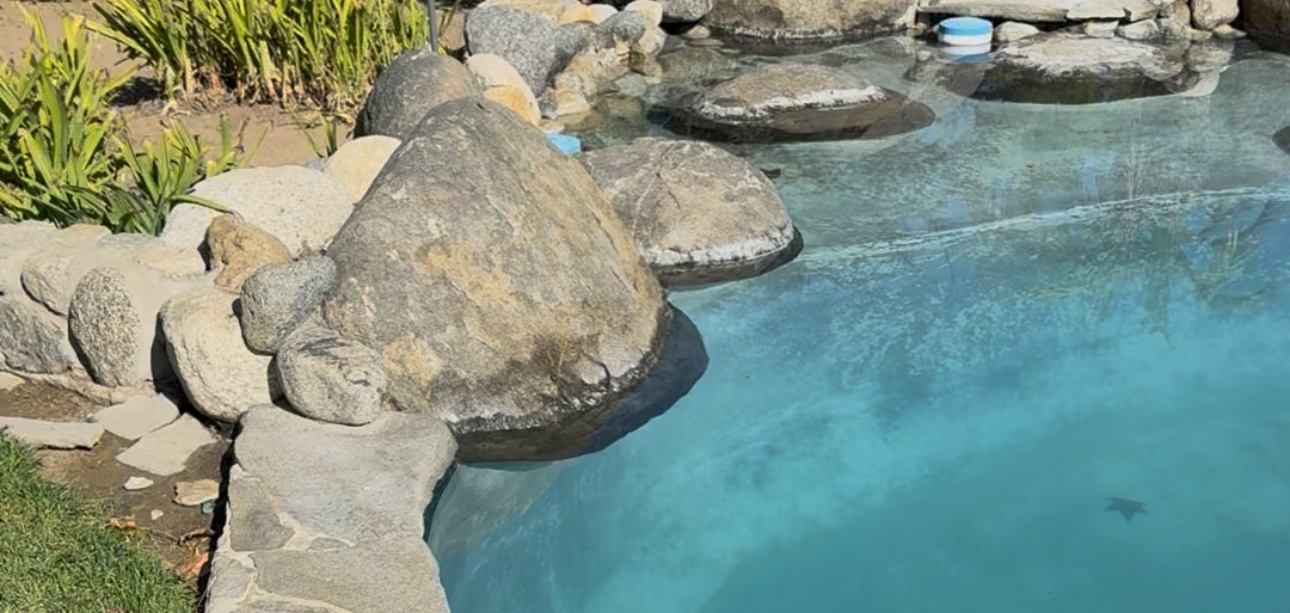
Natural Stones Breakdown: Having natural stone incorporated into the structure of a pool can create problems that are not only expensive and difficult to repair, but also likely to return over time. That’s why natural stone comes in at number four on this list.
While natural stone can be beautiful, it is often a poor choice when used as a structural component of a pool. When installed correctly as a decorative feature, stone can perform well. When it becomes part of the pool wall itself, however, it can turn into a recurring source of leaks.
Despite appearing solid and durable, natural stone moves. It expands and contracts with changes in temperature and can shift slightly over time. Even small movements are enough to crack grout, break seals, and allow the stone to loosen. Once that happens, water can travel behind or beneath the stone and escape from the pool.
The core issue is that even if a leak is patched, the stone will continue to move. This makes it extremely difficult to repair the problem with any certainty that it won’t return.
Homeowners are typically left with two choices:
• Patch the leak, knowing it will likely come back in a year or two, or
• Remove the stone entirely and rebuild that section of the pool wall.
Cost Considerations
Patching a single, average-size natural stone commonly found around pools typically costs $1,000 to $4,000 per stone. Because the underlying movement remains, these repairs often need to be repeated over time.
Removing the stone and rebuilding the pool wall to permanently eliminate the issue is more effective but more expensive, usually ranging from $5,000 to $10,000 per stone, depending on size, location, and surrounding finishes.
What to look for: Not all natural stone in or around a pool is a problem. In some designs, stone is set in front of a fully intact pool wall, meaning the wall itself holds the water and the stone is purely decorative.
A simple way to tell the difference is to ask yourself this:
If the stone were removed, would the pool still hold water?
• If the answer is yes, the stone is decorative and not a structural concern.
• If removing the stone would leave a hole in the pool wall, that stone is structural and may become a future problem.
Bottom Line: Natural stone can be beautiful, but when it is part of the pool’s structure, it often becomes a recurring leak risk. Structural stones that cannot be removed without compromising the pool wall are likely to cause ongoing issues, with repair costs of $1,000 to $4,000 per stone repeatedly—or $5,000 to $10,000 per stone to fix the problem permanently.
#5 - Autofill running / hose in pool
Autofill / Hose Breakdown: A constantly running autofill or a hose left on the pool deck are both strong indicators that a pool may have a leak. That’s why this issue comes in at number five on our list.
When I approach a pool, one of the first things I look for is evidence that the pool has needed frequent refilling. The logic is simple: if a pool has a leak, it loses water—and that water has to be replaced. Any sign of excessive or continuous filling should immediately raise concern.
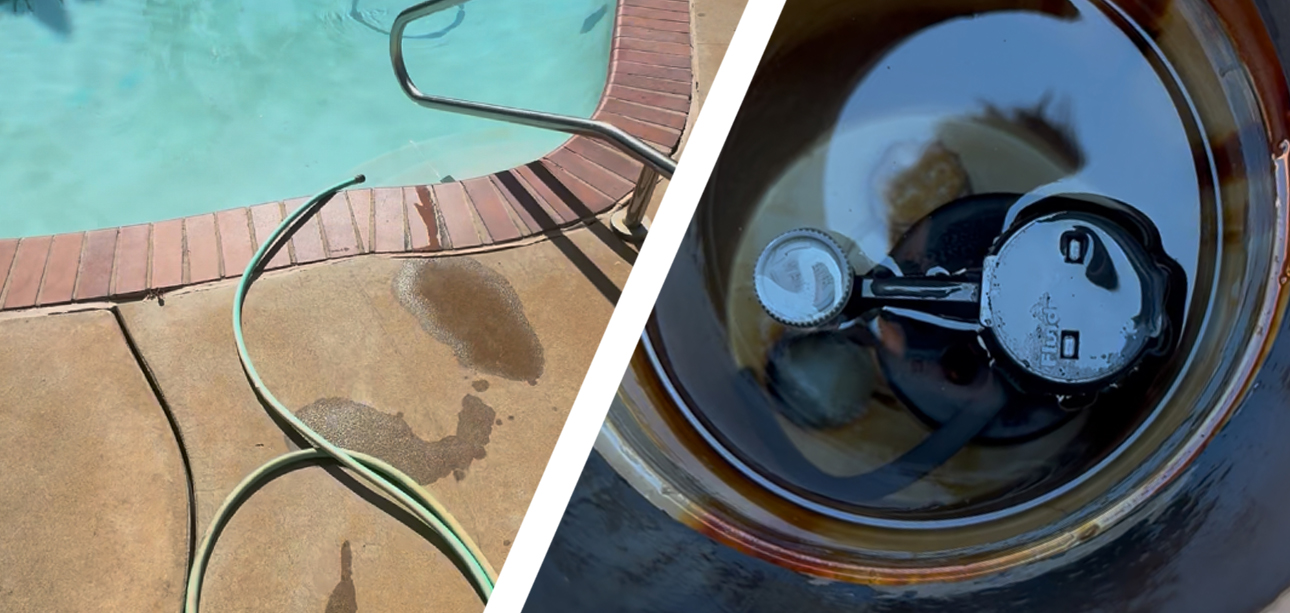
A hose laying on the deck with the end hanging into the pool is a clear red flag. When someone tops off a pool to account for normal evaporation, the hose is usually put away afterward. When the pool needs to be filled constantly, homeowners often stop putting the hose away because they know they’ll be using it again the next day.
If the pool has an autofill system, there should be no need for a hose at all. In this case, walk over to the autofill and listen carefully. A properly functioning autofill typically runs once a day for only a few minutes to make up for normal evaporation.
If you hear water running continuously—or even a faint, steady sound—it may indicate that the autofill is constantly replacing water lost to a leak. Sometimes the sound is very subtle, almost like a soft hissing or whisper. Get close, kneel down, and put your ear near the autofill to be sure. The louder the sound, the more water it is supplying—and the larger the leak it may be compensating for.
What to look for: Autofill systems are usually located in the pool deck beneath a round white cover. Lifting the cover typically reveals a small basin with a float mechanism, similar to what you’d see inside a toilet tank. Some covers are secured with screws, so if you can’t open it, simply listen closely near the cover for the sound of running water.
Bottom line: If the autofill is not running, that is generally a good sign. If it is running continuously, you may not know exactly where the leak is—but you do know that further investigation is needed. And remember: the louder the autofill and the more water flowing into the pool, the larger the leak is likely to be.
In conclusion
Buying a home with a pool doesn’t have to be a mistake, but it does require extra diligence. Many of the most expensive pool problems are hidden from view and can easily be missed during a standard home inspection. Understanding the red flags outlined above gives you the opportunity to ask the right questions, negotiate repairs or credits, or walk away when the risks outweigh the reward. When it comes to pools, what you don’t know can be extremely expensive—so taking the time to investigate before closing can save you tens of thousands of dollars after.
If you live in the San Diego area and would like us to take a look at a pool you are considering buying, Click Here To Contact Us Today!